High ping in Valorant is a serious problem. Internet delay is referred to as ping in online video games. It is the amount of time required for your connection to register a command through the server.
A low ping will improve your game experience. It is mostly caused by a shaky internet connection. But despite having a reliable internet connection, some players in VALORANT are experiencing high ping.
Other reasons behind the high ping in Valorant can be a high number of users who are actively using the platform or an abundance of background programs. If you are also facing high ping in VALORANT don’t panic.
As a starter, you can try to restart the game, computer, and router, to get rid of any minor temporary glitches. You may also test the internet speed on other devices. Once you ensure that the internet is working fine but you still receiving the high ping then you should apply the below fixes.
How To Fix Low Ping In VALORANT
Apply these fixes according to your likening.
Related:
- How To Fix Warzone High Ping Latency On PC
- Fixed: Avast Causing Internet Connection Issues
- How To Fix Ghost Watchers Error While Joining Lobby?
1. Close Background Applications
You may receive a high ping in VAL if you have multiple background programs running or a file that is downloading. It is best to end any pending downloads in such circumstances.
To do so follow the guide:
- Firstly, type Task Manager in the research bar after pressing the windows key, and press the keys Ctrl + Shift + Esc together.
- Choose the program you wish to end from running in the background and consuming too much internet.
- Click on the End Task button in the bottom right corner of the processes tab.
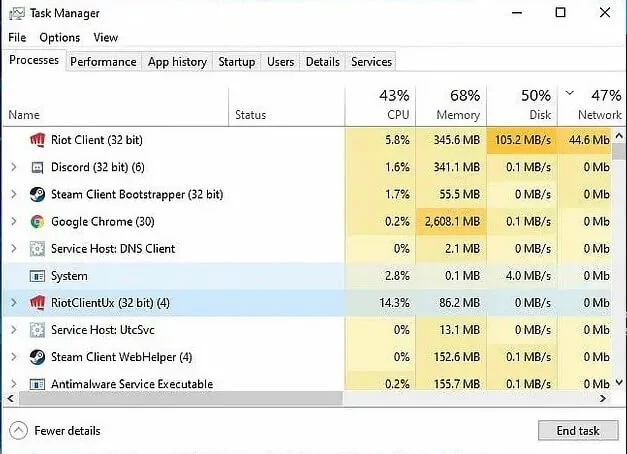
- For each app you wish to shut off, repeat the procedure.
2. Set VALORANT To High Priority
In order to give VALORANT greater attention while it is running on your PC, you may also set VALORANT to high priority. For this, you can:
- Run VALORANT, then log in to Riot.
- Open Task Manager when VALORANT is running.
- Go to the Details tab now.
- On the list, locate VALORANT.
- Set priority by performing a right-clicking on it.
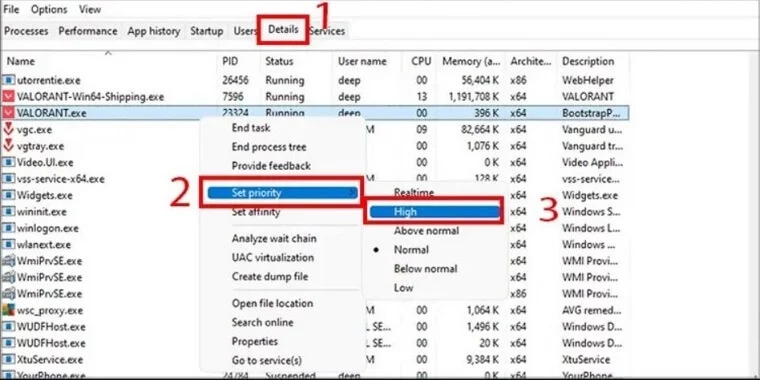
- Depending on how much latency you are experiencing, choose between Above Normal or High.
- In the dialog box that displays, select Change priority.
It is advisable to keep in mind that after VALORANT is closed or your computer is restarted, the priority returns to default.
3. Open Firewall Ports
Sometimes incorrect firewall ports might cause the high ping Valorant problem. You may repair it by adding the necessary firewall ports for the game as shown below.
- Open your Control Panel by typing.
- Select System and Security then Windows Defender Firewall.
- Select Advanced settings, then click Inbound Rules in the left pane and choose New Rule from the context menu.

- In the New Inbound Rule Wizard, choose Port and press Next to proceed.
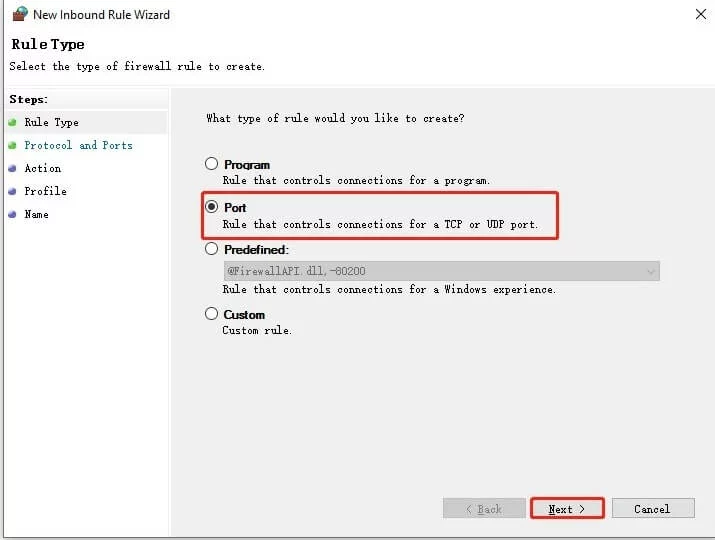
- Next, choose the port (TCP or UDP), enter the port number in the area labeled “Specific local ports,” and then click Next. The following firewall ports are available for reference here:
7000 - 7500 UDP (VALORANT Game Client)
8393 - 8400 TCP (Patcher and Maestro)
2099 TCP (PVP.Net)
5223 TCP (PVP.Net)
5222 TCP (PVP.Net)
80 TCP (HTTP Connections)
443 TCP (HTTPS Connections)
8088 UDP y TCP (Spectator Mode)
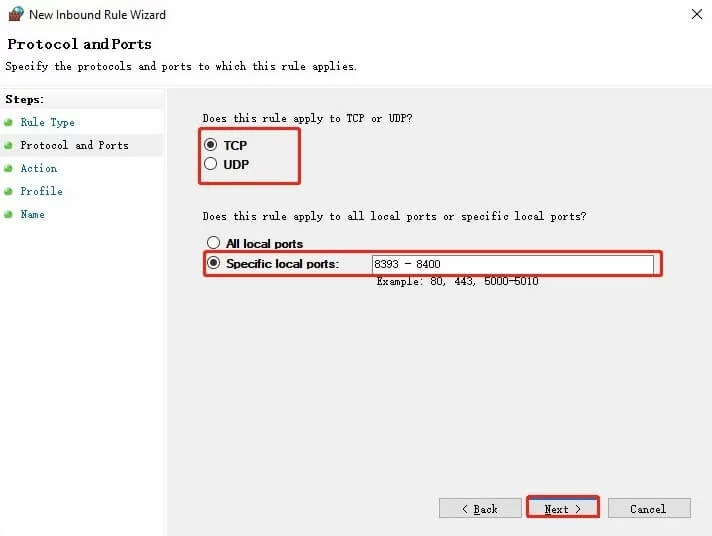
- Choose to Allow the connection and choose Next.
- After that, you may try opening the game again to check whether the issue with the Valorant ping spikes has been fixed.
4. Remove DNS Cache
Using the internet causes your computer to accumulate junk files known as DNS cache over time. These files might clog up your network and somewhat slow it down. Users all throughout the world have claimed fewer ping after cleaning their DNS, despite the fact that altering DNS settings make no noticeable impact.
- Open Search and enter Command Prompt without opening it yet.
- Run as administrator by choosing using the right-click menu on the Command Prompt.
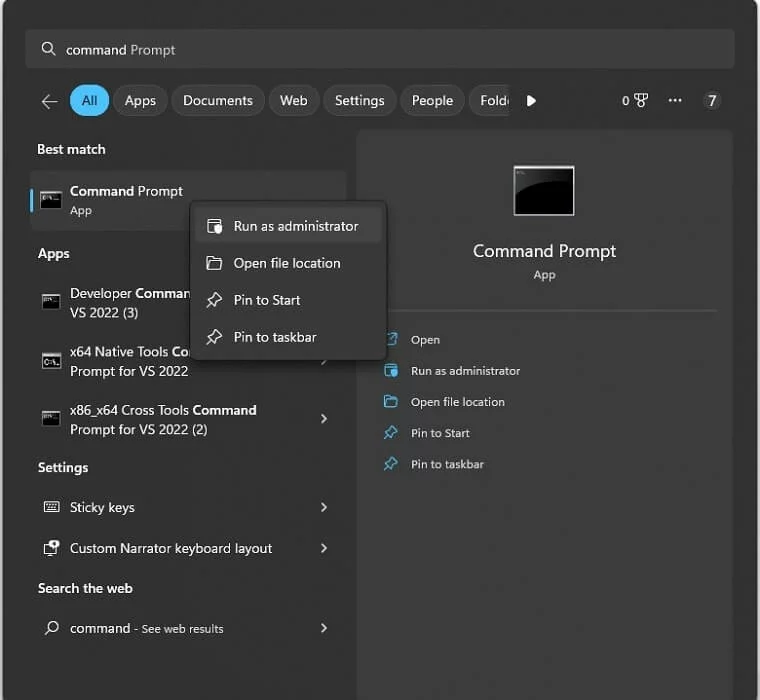
- Now enter each of the following commands one at a time.
ipconfig/flushdns
ipconfig/registerdns
ipconfig/release
ipconfig/renew
netsh winsock reset
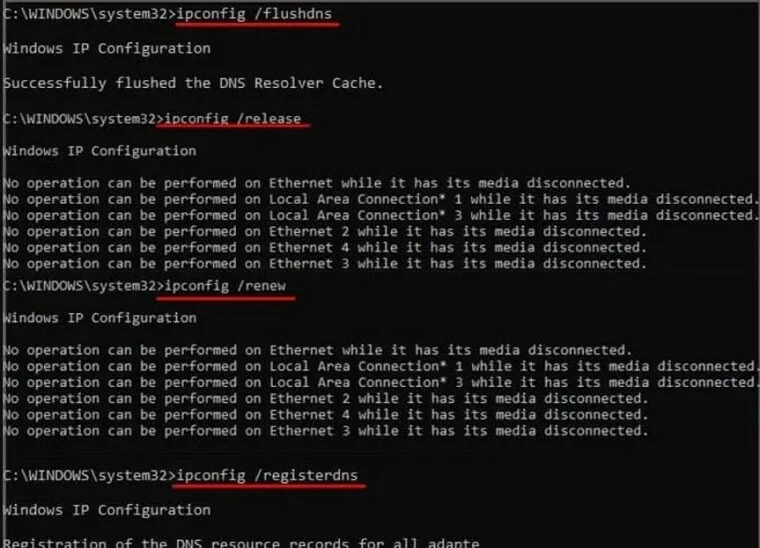
- Restart your PC to finish.
5. Change the DNS server
Your computer connects to the internet and webpages through the DNS server. When your PC utilizes a subpar DNS server, it might occasionally result in high average ping, network problems, and latency spikes in games like VALORANT and others. You ought to think about switching your PC’s DNS server because of this. The following will teach you how to perform this step-by-step:
- Select the first result after entering Control Panel in the search bar.
- Locate and choose the View Network status and tasks option after ensuring that the View by option is set to Category.
- Choose the Change adapter settings option.
- Locate the active internet network (the green one), right-click it, and then choose Properties.
- Locate the Internet Protocol Version 4 (TCP/IPv4) option in the area with checkboxes and double-click it.
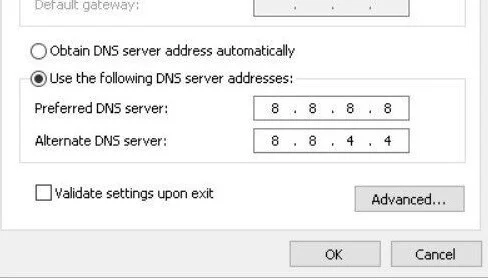
- Check by putting the following DNS server addresses in each box: “8.8.8.8” and “8.8.4.4” after that choose OK.
- Delete the DNS cache.
6. Switch VALORANT Servers
Your game may occasionally connect you to a crowded, laggy server. You can manually switch between the game’s servers and choose the one with the lowest ping to prevent similar situations.
- Launch the game and press Play.
- Choose a game mode.
- Now click the server-related symbol with three horizontal lines. The button is located in the upper-right corner of your player card.
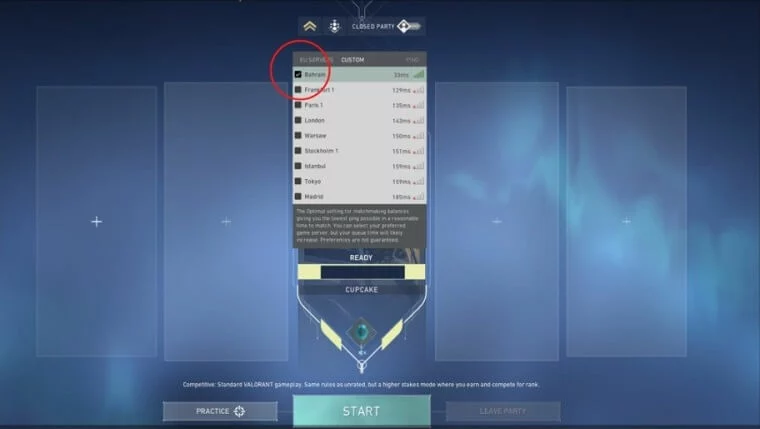
- Select the server on the list that is closest and has the lowest ping.
- While playing the round, check your game and match for a game.


