One after another Redfall players are dealing with errors and issues as they progress in the game. Now for many players, the game is stuck on the loading screen for hours with nothing that the player can do.
It’s a very frustrating situation especially when you have covered most parts of the game and now every time you play Redfall it gets stuck on loading. The probable cause is insufficient hardware, HDD disk, antivirus, or corrupt game file.
If you are also dealing with Redfall stuck on loading screen issue then this article is for you. Although the fixes that we have for you are unofficial we have listed them as per our research and experience. Si until the game devs release the game patch you can apply below mentioned fixes.
How To Fix Redfall Stuck on the Loading Screen?
Before applying the fixes we suggest you update Windows OS, Run the game as administrator, and check system requirements. If the system requirements are low then upgrade your PC.
Minimum
- CPU: Intel Core i5-8400 2.80GHz or AMD Ryzen 5 1600
- GPU: AMD RX 580 / NV GTX 1070 / 6 GB VRAM
- Ram: 16 GB
- OS: Windows 10 64-bit
- Disk Space: 100 GB
- Additional Notes: SSD Recommended
Recommended
- CPU: Intel Core i7-9700K 3.60GHz or AMD Ryzen 7 2700X
- GPU: AMD 5700. BV RTX 2080 / Intel ARC / 8GB VRAM
- Ram: 32 GB
- OS: Windows 10 64-bit
- Disk Space: 100 GB
- Additional Notes: SSD Recommended
1. Turn Off the Antivirus Protection Feature
If you are using any antivirus program on your PC then turn it off or you can add the game to the software’s whitelist. In case you are only using the Windows Security protection on your PC then make sure to disable the real-time protection feature.
Follow these steps:
- Press Windows + I shortcut keys to open the Windows Settings menu.
- Click on Update & Security > Click on Windows Security from the left pane.
- Now, click on the Open Windows Security button.
- Go to Virus & threat protection > Click on Manage Settings.
- Next, you’ll need to turn off the Real-time protection toggle.
- If prompted, click on Yes to proceed further.
2. Delete Locally Saved Games Files
In most cases, if you delete the recently saved game files it can fix the Redfall stuck on loading screen problem. It is because the saved files may get corrupted or misplaced due to abrupt shutdown.
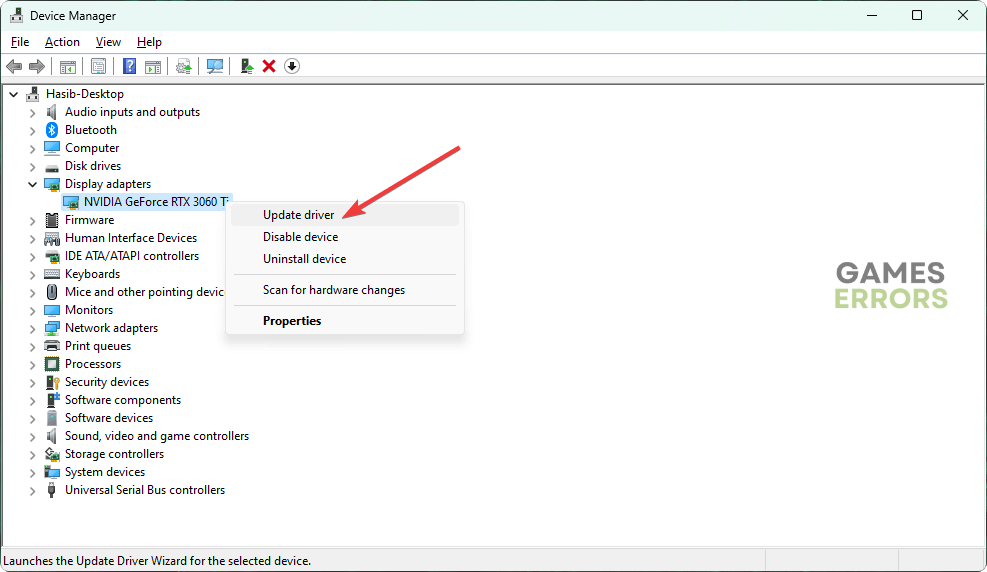
3. Update the GPU driver
Redfall stuck on loading screen issues will haunt you if your PC’s GPU driver is outdated or missing. To resolve this issue, it is recommended that you update your GPU driver by following the steps provided below.
- Press Win + X on the keyboard and go to Device Manager.
- Expand Display Adapters.
- Right-click on the graphics driver and choose Update driver.
- Select Search automatically for drivers.
- Once the process finishes restart the PC
Best Alternate To Update Graphics Driver
NVIDIA and AMD do release game-specific updates that you can download and install on your PC but it takes time.
Especially, if you are a newbie or you don’t have time or skills then there are chances that you might end up installing the wrong graphics drivers.
So we recommend downloading Driver Easy software on your PC. This program is a professional system driver updater that automatically scans a PC’s old driver and updates them instantly.
We have personally used this tool on our Windows 11 PC. The most favorite part is its outstanding scanning feature. You can instantly know which PC part needs to be updated.
The Driver Easy is an N0.1 software updater tool in its field with a mega database of more than 600000 drivers. Users have been using this tool for the last 12 years to fix their PC errors.
So download Driver Easy and let it deal with all the system drivers.
4. Repair Game Files
- Open Steam or the game client you are using for this item.
- Navigate to the game library.
- Right-click on Redfall and then click on Properties.
- Navigate to the Local Files tab.
- Click on Verify integrity of game files.
5. Clear the cache
Clearing the cache of a Redfall on a Windows PC can help resolve issues like being stuck on an infinite loading screen. Follow these steps:
- Press Windows + R and type %appdata%
- Navigate to the game folder and delete all cache files.
6. Use SSD Hard Drive
Using an SSD drive instead of an HDD can increase efficiency and reduce the likelihood of encountering errors, as users with HDDs are more susceptible to such issues.
7. Force Use the Dedicated GPU
For Nvidia :
- Right-click on the blank desktop screen > Open Nvidia Control Panel > 3D Settings > Manage 3D Settings.
- Open Program Settings > Redfall > preferred graphics processor for this program from the list.
- When finished, it will appear as a High-Performance Nvidia Processor.
- Restart the computer after saving your modifications.
For AMD :
- Right-click on the blank desktop screen > Open Radeon Settings > Additional Settings > Preferences > Power > Switchable Graphics Application Settings.
- Select Redfall [If the game is not visible, select Add Application to include the game]
- Select High Performance from Graphics Settings > reboot the PC to apply changes.
8. Run in Clean Boot
Follow these steps:
- Open the Start Menu, type System Configuration, and press Enter.
- Go to the Services tab.
- Click on Hide all Microsoft services and then click on Disable all.
- Click on Apply and OK.
- Restart your Windows PC.
9. Increase the Virtual Memory
Follow these steps.
- Right-click on the Start button and select “System“.
- In the System Settings window, click on “Advanced system settings“.
- In the System Properties window, click on the “Advanced” tab and then click on the “Settings” button under the “Performance” section.
- In the Performance Options window, click on the “Advanced” tab and then click on the “Change” button under the “Virtual Memory” section.
- Uncheck the box next to “Automatically manage paging file size for all drives“.
- Select the drive you want to adjust the virtual memory.
- Select the “Custom size” option and enter the desired values for the initial size and maximum size of the virtual memory.
- Click “Set” and then “OK” to save the changes.
- Restart your computer for the changes to take effect.


