Are you dealing with SteamVR not working? Many users complained that SteamVR won’t launch or crash shortly after running it. Sometimes the users will also see a message “preparing to launch SteamVR” but then it just disappears and does nothing.
The SteamVR won’t work or the launch issue has ruined the gaming experience of many players. Unless you’re one of the fortunate gamers to join in and start playing, it may require some elbow grease to get Steam VR working properly.
In this article, we’ve included the efficient solutions for the Steam VR not working problem.
How to Fix Steam VR Not Working or Launch Issue?
It is advised that you attempt each remedy mentioned here separately until the problem is resolved.
1. Download Redistributing Visual C++ Files
In most cases, the Steam VR not working problem doesn’t show any error message. You can try running vrmonitor.exe directly so that you can see any errors.
If the error does pop up and it relates to msvcp140.dll or vcruntime140.dll then it’s best to download Microsoft Visual C++ Redistributable.
Go to this page and download VC_redist.x64.exe for 64-bit Windows OS.
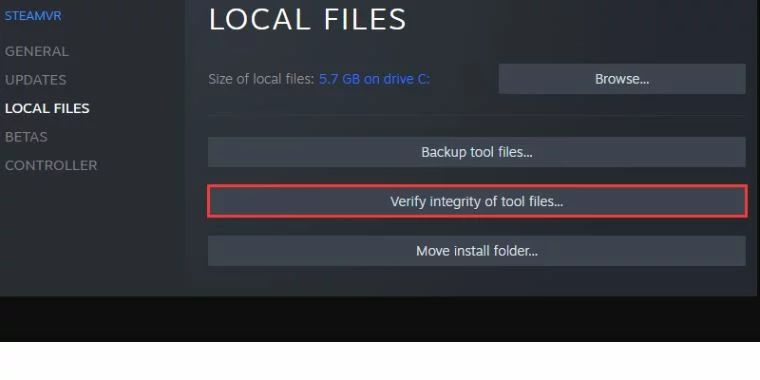
2. Verify the Integrity of SteamVR Tool Files
You can thankfully examine and fix SteamVR file errors using the Steam client. Let’s give it a go.
- Go to LIBRARY in Steam and check the TOOLS option.
- Find SteamVR in the list of tools, then right-click it. After that, choose Properties > LOCAL FILES. Click Verify integrity of tool files in the right pane.
3. Uninstall Conflicting App
Apps like Revive and others tend to interfere with the SteamVR launch process. If you have any third-party app installed uninstall it.
4. Update your Graphics Driver
Steam VR not working problem can link to outdated graphics drivers. You must update your PC’s graphics driver in order for SteamVR to work correctly.

UPDATE YOUR DRIVERS
in Windows 11, 10 and 7
Use Driver Easy to update all the missing & outdated device drivers on PC for free.
You can update drivers by visiting the official sites of Nvidia & AMD. However, if you are new or don’t have skills then we suggest you download Driver Easy on Windows PC.
The Driver Easy is a safe and reliable tool that automatically scans ad update drivers on Windows PC.
5. Modify the PC’s Power Plan
Changing the PC power plan to High Performance fixes the Steam VR not working problem. Follow these steps.
- Open the Run command by simultaneously pressing the Windows key + R. After that, enter powercfg.cpl and press OK.
- Click on High performance. To enlarge the list if you can’t see it, click the downward pointing arrow next to Show other plans.
- Check to see whether your Steam VR is working.
6. Run SteamVR as an Administrator
When your Steam client is unable to access the required permissions, Steam VR won’t work properly. You should thus run Steam as an administrator to fix this.
Right-click the Steam icon >Properties >Compatibility tab> tick Run this program as an administrator >OK.
7. Disable the SteamVR Add-Ons
As several users have seen, SteamVR begins to act strangely when specific add-ons are activated. To find the reason, you can either disable them all at once or one at a time.
- Launch SteamVR. Select the Settings symbol in the top left corner.
- Click the Startup/Shutdown tab.
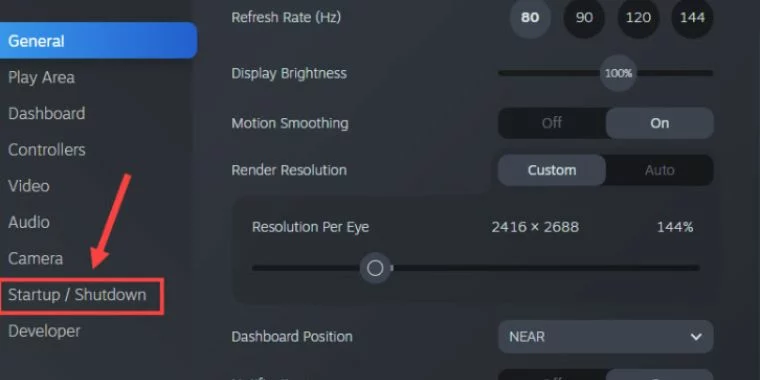
- Then choose MANAGE ADD-ONS.
- Disable each add-on individually or test them all to see which one is the culprit.
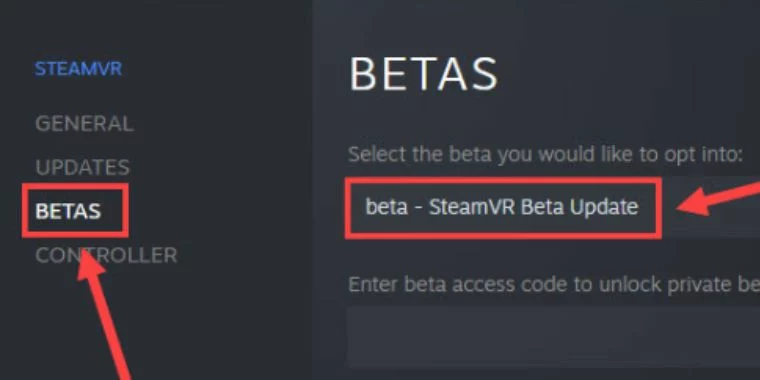
8. Opt into SteamVR Beta
Consider signing up for the Beta version if SteamVR isn’t functioning properly.
- Open the Library tab on the Steam client.
- From the list, right-click Steam, then click Properties.
- Choosing the BETAS tab. Then choose beta – SteamVR Beta Update from the drop-down menu on the right side of the window, and then exit the window.
9. Disable the In-Game Overlay
Many users have confirmed that the in-game overlay may possibly be to blame for the SteamVR won’t launch issue. Try turning off any overlays you may be utilizing on Steam, NVIDIA GeForce Experience, or Discord to see if it fixes the issue.
- Launch Steam and choose Settings by clicking Steam in the upper left corner.
- Uncheck the boxes shown in the screenshot under the In-Game tab. To save the changes, click OK after that.
10. Repair your System Files
Your Steam VR may potentially stop working if necessary system files are missing or damaged. You should repair the system fully by running a deep scan on it, and we recommend using Reimage to do this.
- Install Reimage by downloading it.
To do a free PC scan, launch Reimage and choose Yes. - Your system will be thoroughly scanned by Reimage, which might take some time.
- You’ll get a full report on every issue with your PC once it’s completed. If you want them to be corrected automatically, click START REPAIR. To use this, you must purchase the full version. Additionally, Reimage has a 60-day money-back guarantee, so you may request a return at any point if it is unable to fix the issue.
- Await the completion of successful file validation. Next, select CLOSE.
11. Reinstall SteamVR
To fix the issue where SteamVR won’t launch, you may also try reinstalling it.
- Navigate to Steam> SteamVR> Library>Manage > Uninstall.
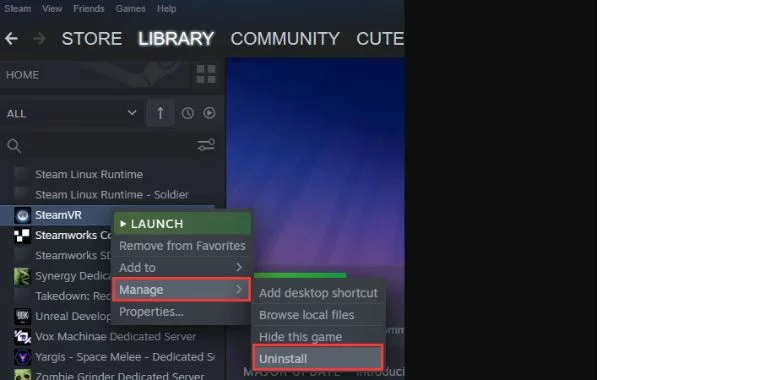
- Click Uninstall in the pop-up window to remove SteamVR from your computer.
- You must re-download all the contents in order to run it in the future, even if it will still be available in the library after uninstalling.
- To download and reinstall SteamVR, double-click the folder containing the app in the library.
- You may now use SteamVR to see if the issue has been resolved.


![[Fixed] Resident Evil Village Lag Issues on PC](https://www.cputemper.com/wp-content/uploads/2022/04/Fixed-Resident-Evil-Village-Lag-Issues-on-PC-300x168.jpg)