Are you dealing with annoying OpenGL error 1282 (Invalid operation) in Minecraft? Now you want to turn off/fix the OpenGL error while playing Minecraft. This error pops up in front of the screen in two different ways. Either as a spam message in-game chat telling you “OpenGL Error: 1282 (Invalid operation”)” or as a bug, resultantly screen goes completely black.
In most cases, OpenGL error 1282 occurs when you are playing Minecraft with incompatible mods & shaders. Other causes, that trigger 1282 errors in Minecraft are missing opengl32.dll files. Outdated Java, Optifine, and graphics driver versions also hinder performance and cause bugs.
If you are also dealing with the Minecraft OpenGL Error: 1282 then here we have explained fixes to solve this error permanently.
How To Turn Off OpenGL Error: 1282 Notification?
In most cases OpenGL error 1282 (Invalid operation) keeps showing up while playing Minecraft. It won’t cause a total blackout and you can play the game just fine. You can simply turn off the Show GL Errors option.
Follow these steps:
- Start up Minecraft and go to the Options menu in the main menu.
- Open Video Settings and then select the Others menu.
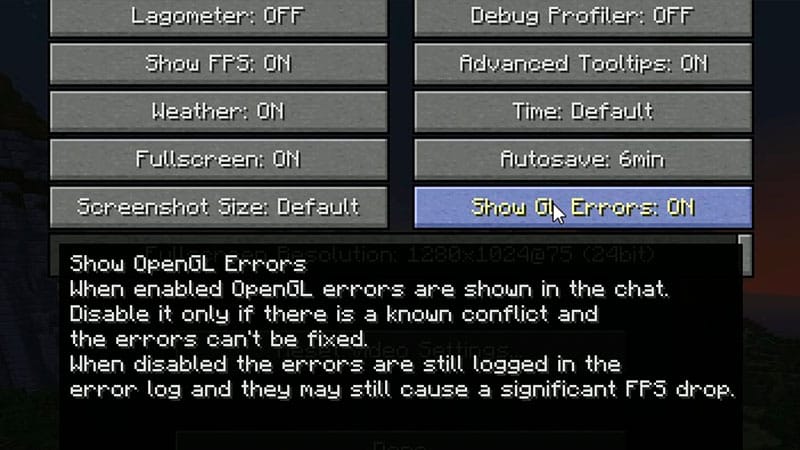
- Look for the Show GL Errors option and turn it off.
- Choose Done.
How to Fix OpenGL Error 1282 in Minecraft
In case the error persists and causes a black screen then follow these solutions.
1. Disable Mods and Shaders
If you are running Minecraft with multiple mods loaded, then most probably a conflict will arise. So you should disable mods and then use the required one to play the game.
Those users who have installed shaders and mods will encounter a black screen because shaders & mods are trying to add the same thing i.e. visual effects. S avoid using them simultaneously.
How To Disable Mods?
- Close Minecraft if it’s running.
- Open the Windows Start menu.
- Type run to open the Run app.
- Now type %AppData% and press Enter.
- Pick the .minecraft folder.
- Open the mods folder.
- Delete the mod folders.
- Back up the mods by copying the folder to other locations first.
- You can uninstall all the mods at once by deleting the mods folder itself.
- However, for proper troubleshooting, you might want to delete each mod one by one to see which one is causing the OpenGL 1282 Error.
- Now open your Minecraft again and see if the error still persists.
How To Disable Shaders?
- Close Minecraft if it’s running.
- Open the Windows Start menu.
- Type run to open the Run app.
- Now type %AppData% and press Enter.
- Pick the .minecraft folder.
- Open the resourcepacks folder.
- Open the shaderpacks folder.
- Delete the shader folders.
- Back up the shaders by copying the folder to other locations first.
- You can uninstall all the shaders at once by deleting the shaderpacks folder itself.
- However, for proper troubleshooting, you might want to delete each shader one by one to see which one is causing the OpenGL 1282 Error.
- Now open your Minecraft again and see if the error still persists.
2. Update Optifine (for Mod Users)
Optifine serves as a beneficial third-party mod that enhances the performance of Minecraft. However, using an outdated version of this mod can lead to potential errors and issues.
To avoid such complications, we recommend visiting the official Optifine website and downloading the latest version available. By updating to the most recent release, you can ensure a smoother and more optimized Minecraft experience.
3. Update Java
If you play Minecraft: Java Edition, it’s essential to keep your computer’s Java software up-to-date. Just visit the official Java website and download the newest version. This way, you can make sure your game runs smoothly and stays secure while you play Minecraft.
4. Update Your Graphic Card Driver
An outdated graphics driver is one of the major factors that cause Minecraft OpenGL Error: 1282 (Invalid Operation). Since the most recent drivers offer several performance enhancements as well as bug fixes for the crashes and performance difficulties you’re experiencing. For updating the graphics driver follow this guide on how to update the graphics driver.
Although NVIDIA and AMD release game-specific updates that you can download and install on your PC it takes time. If you are a newbie you can end up installing the wrong drivers.
So we recommend downloading Driver Easy software on your PC. This program is a professional system driver updater that automatically scans a PC’s old driver and updates them instantly.
The Driver Easy is an N0.1 software updater tool in its field and for 12 years users are using it to fix their PC errors.
So download Driver Easy and let it deal with all the system drivers.
5. Download the Missing DLL File
Although it’s not recommended we have tried this solution and imperfectly works.
So to fix the OpenGL Error 1282 bug you need to download a specific DLL file named opengl32.dll or opengl64.dll. You have to download this file from the online DLL catalog site and paste it into your Minecraft folder. This will likely fix your issue.
6. Temporarily Disable Advanced OpenGL in Minecraft
OpenGL API makes games look better by handling 2D and 3D graphics, but it can clash with certain drivers and cause errors. To see if it solves any issues, try turning off the Advanced OpenGL feature.
- Start up Minecraft.
- Open the Options menu in the main menu.
- If you’re already inside a World, open the game menu using the Escape key.
- Select Video Settings.
- Look for the Advanced OpenGL option and turn it off.
- Choose Done.
7. Reinstall Minecraft
If all else fails, your last option is to reinstall Minecraft to fix any possible issues with the game files. However, before uninstalling, remember to create backups of your important files like saved games, screenshots, resource packs, and mods.
Just open your Minecraft folder, copy the necessary folders, and replace them once the reinstallation is complete. This way, you can keep your important data safe during the process.