Are you searching to control CPU fan speed for Windows 10/11? In this article, you will learn easy solutions on how to increase the fan speed on a PC.
Every PC and laptop has built-in fans that blow off the heat generated when a process is running. While running multiple applications on Windows OS or tabs on Chrome, you might feel hot air coming out of your system.
It doesn’t matter if it’s a high-end gaming rig or gaming laptop, you will hear a CPU fan noise when you boot up your PC and sooner the startup process completes, the noise goes on to decline.
The problem only starts when you constantly hear CPU fan noise or nothing at all when running tasks.
What type of CPU fan can you control on a PC?
The method to control the fan speed on a laptop and PC is highly dependent upon how your PC fans are powered.
You can control only those fans that are connected to your PC motherboard but if these are connected to the power supply then you can’t manually adjust their speed.
You can also check the end of the fan cable to see if you can control the fan speed on the PC.

- Molex fan connectors take power from the PSU. They cannot be manually controlled but can only be limited using a resistor cable.
- 3-pin DC fan connectors are connected to the motherboard, so you can alter their speed by limiting the voltage via BIOS.
- 4-pin PWM (pulse width modulation) can be controlled using fan control software easily.
Why is it important to monitor CPU fan speed in Windows?
The purpose behind the CPU fan is quite simple. They regularly check your PC’s temperature and adjust the CPU fan’s speed by turning it on and off accordingly. Every PC case has air vents to allow the heat to escape.
If you find your CPU fans to be running constantly, it’s a sign that your system is overheating and that may cause problems with your power supply. Thus, it can be very important to maintain a balance with the CPU fan speed while also keeping your PC’s temperature in check.
How to control the fan speed on a laptop with Windows 10?
To check, control, change, monitor, or increase the fan speed on a Windows 10 PC or laptop, apply the methods. If you have a gaming laptop you should keep a close eye on your CPU fan RPM.
- Control CPU fan speed via the Control Panel
- Use BIOS/UEFI to control the CPU fan speed
- Control CPU Fan speed using SpeedFan.
Method 1. Control CPU Fan Speed on Windows 10 via Control Panel
Use the built-in laptop fan control Windows feature to change the fan speed. Open your Control Panel and follow the instructions for laptop fan control.

- Open “Control Panel,” click on “Hardware and Sound,” and then “Power Options.” A new window will appear.
- Click “Change Plan Settings,” and then “Change Advanced Power Settings.” The “Power Options” dialog box will appear.
- In the “Advanced Settings” tab, click on the “Processor Power Management” associated with a plus symbol to open an options submenu.
- Select “System Cooling Policy” from the submenu.
- Click the down arrow under “System Cooling Policy” to reveal a drop-down menu.
- Select “Active” from the drop-down menu to increase the speed of your CPU’s cooling fan.
- Click “Apply” and then “OK.”
Method 2. Laptop fan speed control using BIOS/UEFI
The second-best method to control the fan speed on a Windows 10 PC is using BIOS. Depending upon your PC or laptop model and motherboard manufacturer, they have fan control settings in the BIOS/UEFI.
To do that, you have to dive into the BIOS and follow one of these two methods.
How to open BIOS settings
- Either restart your computer, and when it boots up, press and hold the “Delete” or “F12” keys.
- Or, press Windows + I to open Settings > Update & security >Recovery > Advanced Startup >Restart Now > Troubleshoot >Advanced options > UEFI Firmware settings >Click Restart.
How to change fan speed in BIOS Windows 10?
- Use the arrow keys on your keyboard to locate Fan Speed Control options. This option may vary, but you can always find system fan speed control settings.
- Go to Monitor > Status > Fan Speed Control.
- Look for RPM settings for your computer fan. Select the fan to increase its speed i.e., 400 RPM or 500 RPM, and press Enter
- Repeat the same step No. 4 for all the fans you would like to increase the speed for.
- Press Esc repeatedly until you find the Exit menu.
- Select the “Save Changes and Reset” option to confirm the fan speed changes; your computer will now automatically restart.
Alternatively, you can also find fan control settings in the BIOS here,

Locate the Hardware Monitoring screen or the Advanced Tab, then find PC Health Status. Here you will find
In the BIOS, typically you can adjust the optimal CPU temperature range at which the fan will speed up, and often the speed itself.
Methods 3. Control CPU fan speed using SpeedFan [Fan controller software]
Among other best fan control software, SpeedFan is the most popular and easy-to-use tool. It searches your computer for informative chips and puts up voltages, speeds, and temperatures on display. SpeedFan uses S.M.A.R.T. (Self-Monitoring Analysis and Reporting Technology) sensors that run through your motherboard and video cards to extract accurate, relevant data.
Here’s how you can use it.
Step 1: Download SpeedFan, and once it is downloaded, double-click the file and follow the installation steps.
Step 2: Open SpeedFa,n and you’ll find it in your Windows Start menu. You might need to grant it permission to access your PC’s settings.
Step 3: Check Compatibility. After a moment, you’ll see information about your PC. If you don’t see any fans or they show “0 RPM,” your motherboard isn’t supported by SpeedFan.
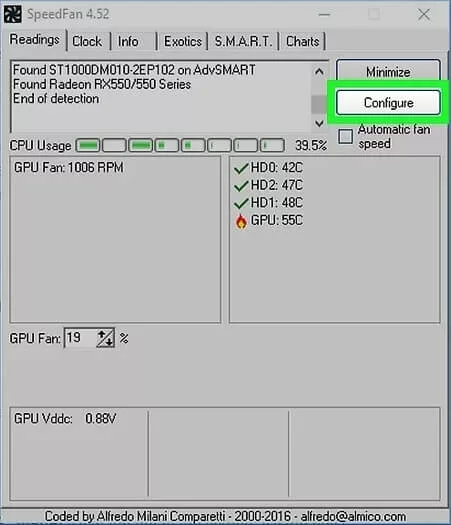
Step 4: Configure Fan Speed by clicking the “Configure” button in the upper-right, and then the “Advanced” tab at the top.

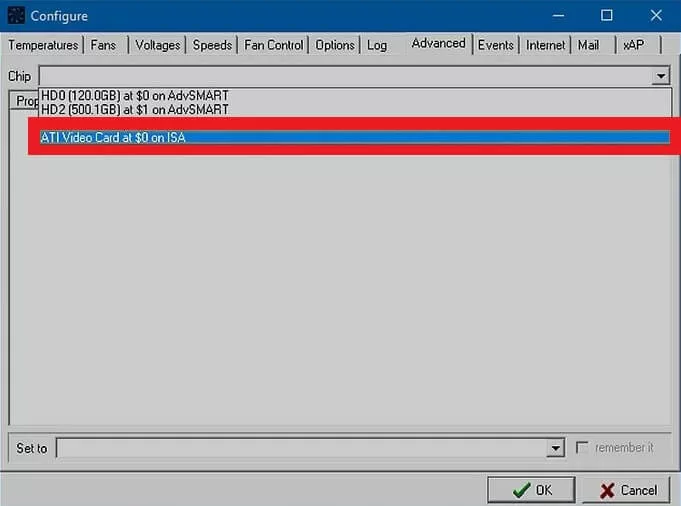
Step 5: Select Choose your CPU from the “Chip” menu. It’s usually something like “IT” ending with “ISA.” Look for entries with “PWM (a number) mode” in the Properties box. If you can’t find your CPU or any options with “PWM mode,” you can’t change fan speed.
Step 6: Now set the PWM Modes that let you change each PWM mode to “Software controlled.” To do this, click on each PWM mode entry and select “Software controlled” from the dropdown menu at the bottom. Avoid “Smart Guardian” as it’s for automatic control.
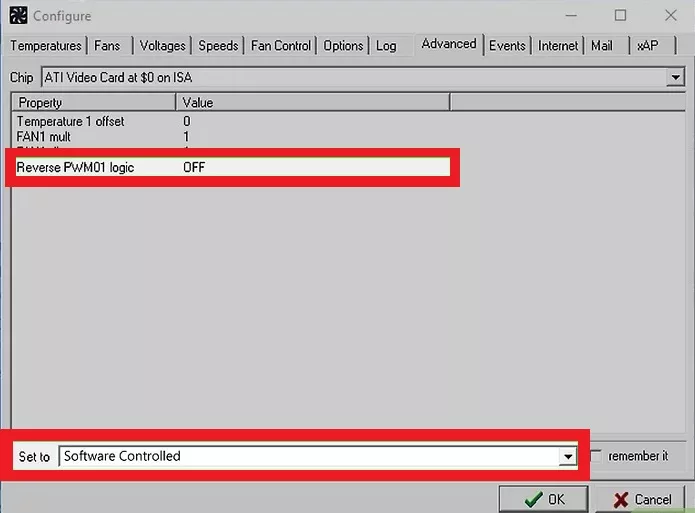
Step 7: Save Changes by clicking “OK” to return to the main SpeedFan screen.
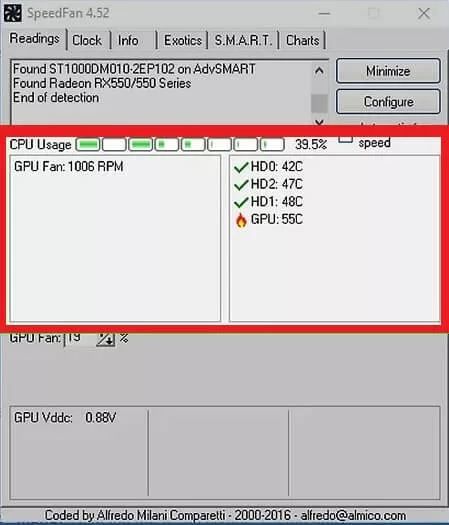
Step 8: To identify PWM controls, look at each fan speed on the left and the corresponding PWMs with percentage values below. Here’s how to identify which PWM controls which fan:
- Write down the percentage of the first PWM setting.
- Set the first PWM to 0% temporarily, and observe which temperature starts rising. This temperature is affected by the PWM. Write it down.
- Return the original percentage to the box.
- Repeat for other PWMs until you know which controls which fan and what the default values are.
Step 9: Adjust Fan Speed: Raise or lower the percentage for each PWM. Start with small adjustments, like changing by 1 or 2 percent. Keep an eye on temperatures to avoid overheating and monitor how it affects performance.
This PC fan control software also lets you check accurate CPU temperature readings. You can also see your current fan RPM. You can manually control and increase the fan speed on a laptop with these tools.
Note: Speedfan supports a wide variety of computer motherboards and sensor chips. If this laptop fan control software lacks support then you can download Argus monitor or MSI Afterburner.
Another disadvantage of this fan speed control for Windows 10 is that it only supports built-in CPU and Case fans.
If SpeedFan not detecting fans then you might have additional PC fans in your system. This fan control software doesn’t control them.
If PC fan controller software doesn’t let you control, change, or increase the fan speed on a laptop PC, then don’t worry, you have plan B.
Method 4. Buy an External Fan Hub to Control CPU Fan Speed on a PC

Most of the software that increases fan speed only supports built-in CPU fan and case fans. What if you have installed additional aftermarket PC fans? Buying an external fan controller for the PC will be the best option in this case.
Of course, this method is only applicable on a desktop computer because the laptop doesn’t support fan speed controllers. For laptops, buy the best laptop cooling pads.
Here’s our list of the best PC fan controller hubs that you can currently find. These hardware components fit in the computer drive bay and have knobs that allow you to manually control the fan speed on the PC. You can increase the fan speed up to 100% or lower.
You can also see the current PC fan RPM, but you can’t monitor CPU temperature or GPU temperature on these devices. For that, you should download the best CPU temperature monitor.
How do I fix CPU Fan Speed errors?
The CPU Fan error is usually triggered when you’ve turned on your PC. As such, the fan error on the boot occurs due to some hardware issue, and It may not be due to CPU overheating. The most common cause why a CPU fan would run at full speed is that its sensor is not working properly. The solution here is to replace the fan itself. But you need to see that the processor is not always hot.
Increase CPU Fan Speed – FAQ
What causes computer fans to speed up?
There are sensors placed on the motherboard. When the CPU or GPU generates heat, these sensors turn on the computer fan. The only purpose is to maintain the ideal PC temperature.
What are the best programs to change fan speed?
Apart from using SpeedFan, multiple hardware monitoring programs also let you control PC fan speed. Here is our list of the best PC fan control software.
Can I use a hardware fan controller to manually adjust CPU fan speed?
In case the software doesn’t let you control the fan speed, then there are hardware components that let you do the part. Here’s our list of best fan controller hubs.
How do I increase my laptop fan speed with Windows 10?
You can use BIOS settings to change the fan speed on a laptop because most fan control software lacks support for laptop fans.
Is it normal for laptop fans to run constantly?
Yes, laptop fans always run during normal use. The idea is to cool down internal hardware and prevent overheating. But when your laptop fan runs loudly, it’s not normal.
How to check CPU fan speed on Windows 10?
To check at what speed your CPU fan is runnin,g download SpeedFan or Argus Monitor. These tools will show you the exact RPM of your PC fans.
How to decrease fan speed on a laptop with Windows 10?
To decrease your laptop fan speed, you can download HWInfo64. This tool supports most laptop fan settings. Use the HWiNFO fan control option to manually decrease or increase laptop fan speed.
How To Change CPU Fan Speed Without BIOS?
If you don’t know how to change fan settings using BIOS, then download third-party fan control software.
What is the ideal CPU fan Speed for a laptop or PC?
The ideal CPU fan speed of a laptop depends on a host of things, but if you run it at 70% then it’s good. If you want to know what RPM is normal for laptop fans, then 3000 to 4000 RPM is considered to be the best range.
Is it bad if my computer fan is loud?
If your computer fan is constantly loud, then it may be a problem with your fan bearing, or your PC is full of dust. Try to clean your PC intakes that are clogging fresh air.
How to Reset Idle Speed on a Computer
Go to Control Panel > Power Options > Change plan settings > Change advanced power settings > Change settings that are currently unavailable.
Scroll down till you see Processor Power Management, expand it, and click on Minimum Processor State. Type the new desired percentages and Apply.
How to lower the fan speed on a PC and a Laptop?
You can get into BIOS settings and locate fan control options. Use these options to lower to turn down the fan speed.
FAQ
In Windows 10, how can I regulate the CPU fan speed?
In Windows 10, try using a third-party program like Speedfan to regulate your CPU fan. After downloading Speedfan, you may either choose Configure > Advanced, then locate your fan and set it to Manual, or you can pick Automatic fan speed to have Speedfan manage your system automatically. Return to the main page after setting it to Manual and change the fan speed level.Is it better to have an intake or exhaust CPU fan?
The fans near the front of the PC case are probably intake fans, which draw in colder air to assist cool the case. The fans at the back are usually exhaust fans, which release the heated air from the computer’s parts.How may a CPU fan be removed?
Remove any obstructions, such as ducts, and ensure that the processor is visible. Locate and gently unplug the power cord that connects the fan to the motherboard. Locate the clip that holds the fan to the CPU, then use a screwdriver or other similar instrument to carefully press down until the fan unlatches. The processor’s heat sink should then be taken out.Why is the fan on my CPU so loud?
Your CPU fan may be noisy due to dirt and dust accumulation. The solution is to clear the debris with a can of compressed air. In order to prevent the fans from overworking, you should also position your computer in a well-ventilated area and think about getting a cooling pad for your laptop.