More and more players are complaining that The Lord Of The Rings Gollum’s low GPU usage is causing performance issues like stuttering and, at some point, crashing problems. The game has been released with absurd PC requirements, which contribute to these problems.
Low GPU usage in The Lord Of The Rings Gollum can be attributed to several factors, including poor optimizations, outdated drivers, and incorrect in-game settings. These elements can collectively contribute to the problem, leading to subpar performance issues.
If you are also stuck in this situation then read this article. as we have mentioned solid solutions to fix The Lord Of The Rings Gollum Low GPU Usage.
How To Fix The Lord Of The Rings Gollum Low GPU Usage On High-End PCs
Before applying the fixes we suggest you update the game and Windows, check system requirements, and if the issue persists move on to fixes.
Minimum:
- OS: Windows 10/11
- Processor: Intel Core i5-4690 / AMD Ryzen 3 1300X
- Memory: 8 GB RAM
- Graphics: Nvidia GTX 1060, 6GB / AMD Radeon R9 290X, 4GB
- DirectX: Version 12
- Storage: 45 GB available space
Recommended:
- OS: Windows 10/11
- Processor: Intel Core i7-8700K / AMD Ryzen 5 3600X
- Memory: 16 GB RAM
- Graphics: NVIDIA GeForce RTX 3070, 8GB / AMD Radeon RX 6750 XT, 12GB
- DirectX: Version 12
- Storage: 45 GB available space
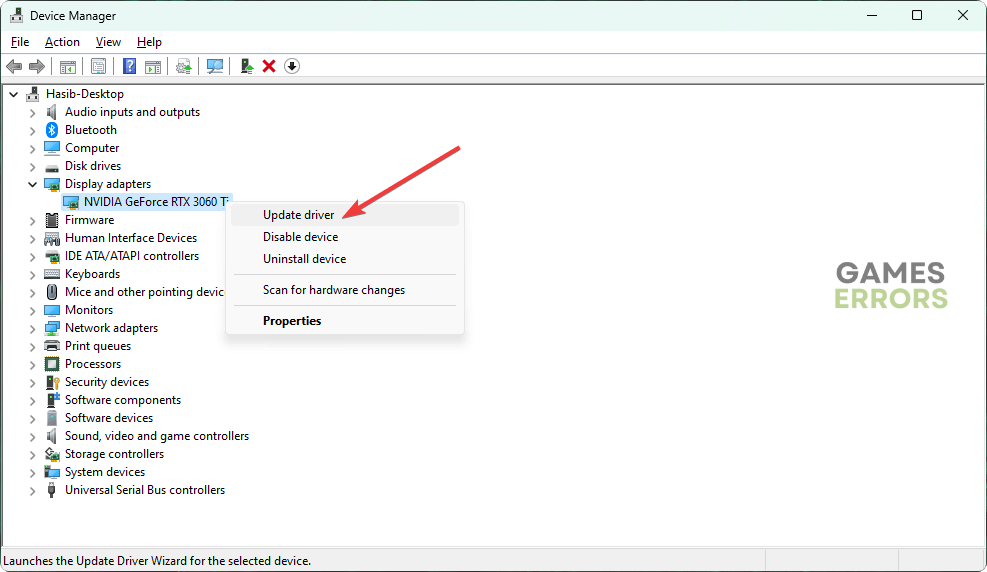
1. Update GPU Driver
The Lord Of The Rings Gollum low GPU usage issues will haunt you if your PC’s GPU driver is outdated or missing. To resolve this issue, it is recommended that you update your GPU driver by following the steps provided below.
- Press Win + X on the keyboard and go to Device Manager.
- Expand Display Adapters.
- Right-click on the graphics driver and choose Update driver.
- Select Search automatically for drivers.
- Once the process finishes restart the PC
Best Alternate To Update Graphics Driver
NVIDIA and AMD do release game-specific updates that you can download and install on your PC but it takes time.
Especially, if you are a newbie or you don’t have time or skills then there are chances that you might end up installing the wrong graphics drivers.
So we recommend downloading Driver Easy software on your PC. This program is a professional system driver updater that automatically scans a PC’s old driver and updates them instantly.
We have personally used this tool on our Windows 11 PC. The most favorite part is its outstanding scanning feature. You can instantly know which PC part needs to be updated.
The Driver Easy is an N0.1 software updater tool in its field with a mega database of more than 600000 drivers. Users have been using this tool for the last 12 years to fix their PC errors.
So download Driver Easy and let it deal with all the system drivers.
2. Repair Game Files
- Open Steam or the game client you are using for this item.
- Navigate to the game library.
- Right-click on The Lord Of The Rings Gollum and then click on Properties.
- Navigate to the Local Files tab.
- Click on Verify integrity of game files.
3. Enable High-Performance Mode
To enable high-performance mode in display settings in Windows 10, follow these steps:
- Right-click on the desktop and select “Display settings.”
- In the Display settings menu, scroll down and click on “Graphic settings.”
- Find The Lord Of The Rings Gollum in the list below or click on the browse button and navigate to The Lord Of The Rings Gollum icon.
- Click on The Lord Of The Rings Gollum and then click on Options.
- Check on High performance.
- Click on the Save button to apply your changes.
4. Close Unnecessary Tasks
If your computer doesn’t have enough RAM or CPU power, your GPU may not be able to run at full capacity. So, just close unnecessary programs.
- Press Ctrl + Shift + Esc to open the Task Manager.
- Check and identify any programs that are not required for the game.
- Right-click on the program and select “End task“.
- Launch The Lord Of The Rings Gollum and check if the issue is resolved.
5. GPU Drivers In Performance Mode
Setting GPU drivers in performance mode can help improve performance in The Lord Of The Rings Gollum by optimizing the graphics card settings for high performance.
Here’s how you can do it:
- Right-click on the desktop and select “NVIDIA Control Panel” or “AMD Radeon Settings,” depending on your graphics card.
- In the control panel, navigate to the “Manage 3D settings” or “Gaming” category.
- Find the “Power management mode” or “GPU Workload” option and set it to “Prefer maximum performance” or “Compute,” respectively.
- Save your changes and exit the control panel.
6. Adjust In-Game Settings
The Lord Of The Rings Gollum has a variety of graphics settings that can be adjusted to improve GPU usage.
- Launch The Lord Of The Rings Gollum.
- Go to the graphics settings menu.
- Set the graphics quality to high.
- Adjust other settings such as texture quality, shadows, and ambient occlusion.
- Increase the resolution if necessary.
7. Use a Performance Monitoring Tool
These tools can help you identify the cause of low GPU usage and adjust settings accordingly.
- Download and install a performance monitoring tool such as MSI Afterburner or GPU-Z.
- Launch the tool and monitor your GPU usage.
- Adjust in-game settings according to the GPU usage readings.
- Continue monitoring and adjusting settings until you find the optimal settings for your system.
8. Disable V-sync
The steps to disable V-Sync in The Lord Of The Rings Gollum:
- Launch the game.
- Go to the graphics settings menu.
- Look for an option labeled “V-Sync” or “Vertical Sync.”
- Disable the V-Sync option by toggling it off.
- Save your changes and exit the graphics settings menu.
9. Enable Game Mode
Enabling Game Mode should prioritize system resources for gaming applications, including The Lord Of The Rings Gollum, and potentially improve performance.
- Go to your PC Settings.
- In the Settings menu, select the “Gaming” category.
- In the “Gaming” menu, click on the “Game Mode” option in the left-hand sidebar.
- Toggle on the “Game Mode” switch to enable it.
- If desired, you can also enable the “Hardware-accelerated GPU scheduling” option by toggling its switch on.
- Close the Settings menu.
10. Disable All-Power Preserving Mode
You can also set your power option to High-Performance Mode.
- First, press Win + R to launch the Run dialog.
- Paste powercfg.cpl in the box and press Enter to open the Power Options.
- Choose High performance and confirm this change.
11. Repair The Lord Of The Rings Gollum
Repairing the game files is another option to fix any issues with The Lord Of The Rings Gollum that may be affecting its performance. Here’s how you can do it:
- Open the Steam client and go to the Library.
- Right-click on The Lord Of The Rings Gollum.
- Find the option to “Verify Integrity of Game Files” or “Repair Game Files,” and click on it.
- The launcher will then scan the game files and check for any corrupt or missing files.
- Otherwise, you can also reinstall the game again.
12. Use a Dedicated GPU
Most PC has integrated and dedicated GPU. That’s what causes conflict in the utilization of low GPU. The best way is to disable the integrated GPU through Device Manager.
Follow these steps:
- Press the Windows + X key on your keyboard to open the Quick Link menu, then select “Device Manager.”
- In the Device Manager window, expand the “Display Adapters” category and you’ll see both the integrated GPU and the dedicated GPU listed.
- Right-click on the integrated GPU and choose “Disable device,” then confirm any prompts that appear.
- Once disabled, the dedicated GPU will become the primary graphics processor used by your computer.
13. Turn on Hardware Scheduling
Another solution to address this issue is through Hardware Scheduling, but keep in mind that your GPU must be compatible
To activate Hardware Scheduling, follow these steps:
- Click on the Start button on your Windows PC.
- Select Settings from the Start menu.
- Click on System.
- Choose Display from the options available.
- Scroll down and look for Graphic settings.
- Toggle on the “Hardware accelerated GPU scheduling” option.
- It is recommended to restart your PC before launching the game.


